
Setting Up Linux on Windows Using WSL
May 14, 2025
Are you interested in exploring Linux but hesitant to leave the comfort of your Windows environment? The Windows Subsystem for Linux (WSL) offers a seamless way to run a Linux distribution alongside your Windows system without the need for dual-boot setups or virtual machines. This guide will walk you through the process of installing, configuring, and using WSL to get the best of both worlds.
I really recommend watching this video 👇🏻
Get Started with the Windows Subsystem for Linux
What is WSL?
The Windows Subsystem for Linux (WSL) is a compatibility layer developed by Microsoft that allows you to run a Linux environment directly on Windows. It enables you to execute Linux command-line tools and applications alongside your Windows applications. WSL comes in two versions:
- WSL 1: Translates Linux system calls into Windows system calls.
- WSL 2: Introduces a full Linux kernel running in a lightweight virtual machine, offering improved performance and full system call compatibility.
WSL 2 is the recommended version for most users due to its enhanced capabilities.
Installing WSL
Step 1: Enable WSL
-
Open PowerShell or Command Prompt as an administrator.
-
Run the following command:
wsl --installThis command will enable the necessary features and install the default Linux distribution (Ubuntu).
-
Restart your computer when prompted.
For detailed instructions, refer to the official Microsoft documentation: Install WSL
Step 2: Set Up Your Linux Distribution
After restarting, launch the installed Linux distribution (e.g., Ubuntu) from the Start menu. The first time you run it, you’ll be prompted to create a new user account and password for your Linux environment.
Understanding WSL Architecture
WSL 2 utilizes virtualization technology to run a real Linux kernel inside a lightweight utility virtual machine (VM). This architecture provides full system call compatibility, improved performance, and the ability to run more complex Linux applications.
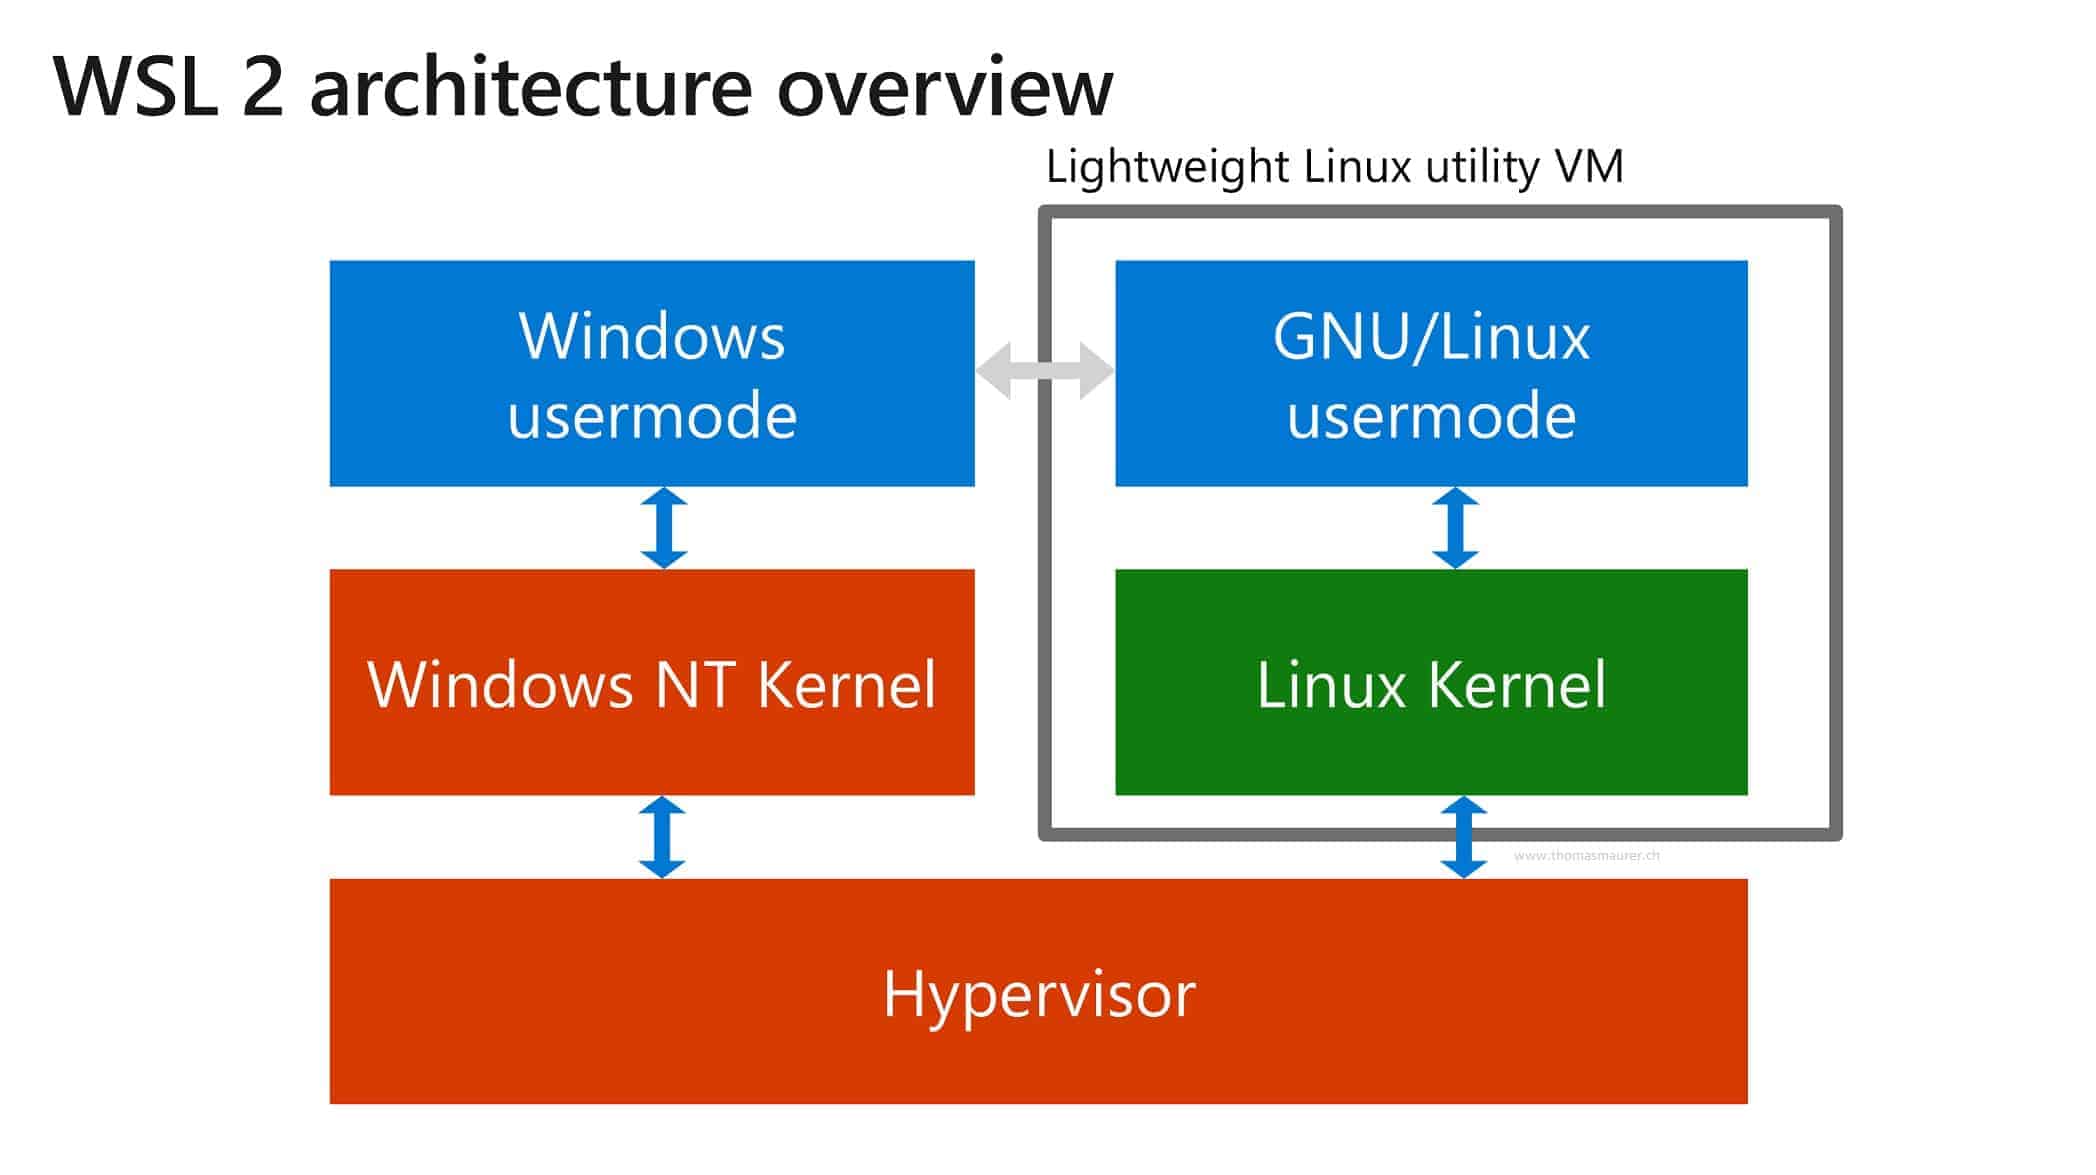 Figure 1: WSL 2 Architecture
Key features of WSL 2 include:
- Full Linux Kernel: Provides complete compatibility with Linux applications.
- Improved File System Performance: Faster file system operations compared to WSL 1.
- Docker Support: Ability to run Docker containers natively.
Learn more about WSL architecture
Using WSL
Launching WSL
You can launch your WSL distribution in several ways:
- Start Menu: Search for your installed distribution (e.g., Ubuntu) and click to open.
-
Command Line: Open PowerShell or Command Prompt and type:
wsl
This will open your default WSL distribution.
Running Linux Commands
Once inside the WSL terminal, you can execute Linux commands as you would on a native Linux system. For example:
> sudo apt update
These commands update the package list (do it when setting first time compulsory, then periodically when needed), respectively.
Accessing Windows Files from WSL (Optional)
WSL allows you to access your Windows file system. For example, your C: drive is mounted at /mnt/c/. You can navigate to your desktop using:
> cd /mnt/c/Users/<YourUsername>/Desktop
Currently, not advised to make any changes to Windows System through wsl. It is advised to always start with `/` [ root folder ] To navigate to root folder (in WSL), look at the following Example,
> C:\Users\ganes>wsl

> [ganesh@Ganesh-PC ganes]$ cd /

> [ganesh@Ganesh-PC /]$ ls
  afs  boot  etc   init  lib64   media   opt   root  sbin  sys  usr
  dev   home  lib   lost+found   mnt    proc  run   srv   tmp  var

> [ganesh@Ganesh-PC /]$
We’ll dive deeply into Linux Folder structure and Permissions in another chapter
Customizing WSL
Installing Specific Linux Distribution
WSL supports multiple Linux distributions. To view available distributions, run:
> wsl --list --online
To install a specific distribution, use:
> wsl --install -d <DistributionName>
Replace <DistributionName> with the name of the distribution if you wish to install.
Setting the Default Distribution
If you have multiple distributions installed, you can set the default in (powershell) using:
wsl --set-default <DistributionName>
Integrating WSL with Development Tools
WSL can be integrated with various development tools to enhance your workflow:
- Visual Studio Code: Use the Remote - WSL extension to develop within WSL.
- Git: Install and configure Git within WSL for version control.
- Docker: Run Docker containers natively within WSL 2.
Troubleshooting Common Issues
- WSL Not Installing Properly: Ensure that virtualization is enabled in your BIOS/UEFI settings.
- Permission Issues: Run your terminal as an administrator when performing system-level operations.
- Network Connectivity: Restart the WSL service or your computer to resolve network-related issues.
Conclusion
The Windows Subsystem for Linux provides a powerful and convenient way to run a Linux environment directly on your Windows machine. Whether you’re a developer, system administrator, or just curious about Linux, WSL offers a seamless integration that enhances your productivity without the need for dual-boot setups or virtual machines.