
SSH (Secure Socket Shell)
May 20, 2025
Table of Contents
- Table of Contents
- Understanding What SSH Is
- The Basic SSH Connection
- Basic Commands
- SSH Key-Based Authentication
- SSH for File Transfer and Port Forwarding
- Hardening Your SSH Server: Best Practices for
sshd_config - Troubleshooting Common SSH Issues
If there’s one tool that truly forms the backbone of our daily operations, it’s SSH – the Secure Shell. It’s more than just a command; it’s the digital equivalent of a secret handshake, a secure conduit that allows me to traverse networks, manage remote servers, and execute commands as if we were sitting right in front of them.
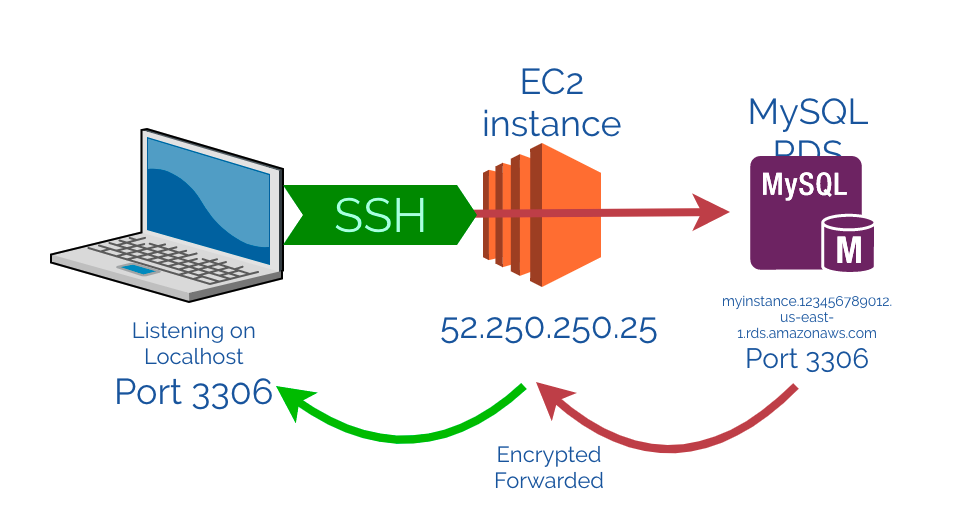 Figure 1: SSH lets you connect with remote servers
Understanding What SSH Is
Before we plunge into the practicalities, let’s take a moment to appreciate what SSH actually is and why it became an indispensable part of our toolkit. In the early days of networked computing, administrative tasks on remote machines were often performed using insecure protocols like Telnet or rlogin. These protocols transmitted data, including passwords, in plain text, making them incredibly vulnerable to eavesdropping and interception. I’ve heard horror stories from colleagues about network sniffers picking up credentials, and that’s precisely the nightmare SSH was designed to prevent.
SSH operates at the application layer of the TCP/IP model, establishing a secure, encrypted connection between a client (your local machine) and a server (the remote machine you want to access). This encryption ensures that all data exchanged – from login credentials to command outputs and file transfers – remains confidential and protected from prying eyes. It’s a client-server architecture, meaning there’s an SSH client on your local machine and an SSH server (daemon, usually sshd) running on the remote machine. Without sshd listening for connections, no amount of client-side magic will get you in.
The idea of securely managing a server halfway across the globe, without worrying about network attacks, was a game-changer. It transformed remote administration from a risky endeavor into a reliable and secure routine.
The Basic SSH Connection
The most fundamental SSH command is also the one you’ll use most frequently. It’s the gateway to your remote Linux systems.
ssh username@vm-ipaddress
Let’s break down this command, as it’s something we will type countless times a day:
ssh: This is the command-line client that initiates the Secure Shell connection.username: This is the login name of the user account on the remote server that you want to access. It’s crucial to ensure this user account exists on the target machine. If you omitusername@, SSH will try to connect using your local username on the remote machine. For instance, if my local username isaliceand I runssh 192.168.1.100, SSH will attempt to log in asaliceon192.168.1.100. I always specify the username explicitly to avoid confusion.vm-ipaddress(orhostname): This is the IP address or hostname of the remote server. For instance,192.168.1.100ormyremoteserver.example.com. DNS resolution needs to be working if you use a hostname.
our Connection Flow:
- We type
ssh myuser@192.168.1.100. - The SSH client on my machine attempts to connect to port 22 (the default SSH port) on
192.168.1.100. - The
sshddaemon on the remote server responds, and a secure, encrypted tunnel is established. - The server then asks for authentication. By default, this is password-based. I enter
myuser’s password. - If the password is correct, I’m granted a shell prompt on the remote machine. My command line now reflects the remote system.
Initial Connection Warning: The first time you connect to a new SSH server, you’ll see a warning about the host’s authenticity:
The authenticity of host '192.168.1.100 (192.168.1.100)' can't be established.
ECDSA key fingerprint is SHA256:****************************************.
Are you sure you want to continue connecting (yes/no/[fingerprint])?
This is SSH’s way of protecting you from Man-in-the-Middle (MitM) attacks. The fingerprint is a unique identifier for the remote server’s public key. I always verify this fingerprint, usually by obtaining it out-of-band (e.g., from the server’s administrator or a trusted source) before typing yes. Once you type yes, the server’s public key is added to your ~/.ssh/known_hosts file, and you won’t be prompted again unless the server’s key changes (which could indicate a MitM attack or a legitimate server rebuild). This known_hosts file is crucial for SSH’s security model.
Basic Commands
Once connected via SSH, I’m effectively working on the remote Linux machine. All the standard Linux commands I’m familiar with work just as they would locally.
ls -l: List files with detailed information.cd /var/log: Change directory to/var/log.sudo apt update: Update package lists (on Debian-based systems).df -h: Check disk space usage.
One of the first commands we often run to confirm our connection and get a quick overview of the remote system is uname -a.
uname -a
This command provides comprehensive system information:
uname: Stands for “Unix name”.-a: Stands for “all”, displaying all available information.
A typical output might look like this:
Linux myremoteserver 5.4.0-100-generic #113-Ubuntu SMP Tue Feb 15 17:09:44 UTC 2022 x86_64 x86_64 x86_64 GNU/Linux
From this, we can quickly deduce:
Linux: The kernel name.myremoteserver: The hostname of the remote machine.5.4.0-100-generic: The kernel version.#113-Ubuntu SMP Tue Feb 15 17:09:44 UTC 2022: Build information and timestamp.x86_64: The machine’s hardware architecture (64-bit).GNU/Linux: The operating system distribution.
This immediate feedback confirms I’m on the correct system and gives me a baseline understanding of its environment.
SSH Key-Based Authentication
While password authentication works, it’s not the most secure or convenient method, especially when you’re managing multiple servers. Brute-force attacks can target weak passwords, and typing complex passwords repeatedly gets tedious. This is where SSH key-based authentication comes in – and it’s my preferred method for all my servers.
SSH keys consist of a pair:
- Public Key: This key resides on the remote server (
~/.ssh/authorized_keysfile) and can be freely shared. - Private Key: This key resides on your local machine (
~/.ssh/id_rsaby default) and must be kept secret.
When you try to connect, the remote server challenges your client. Your client responds by signing the challenge with your private key. The server then uses your public key to verify the signature. If it matches, you’re authenticated without ever sending your password over the network. This is cryptographically secure and much more robust than passwords.
Our SSH Key Workflow:
-
Generate SSH Keys (if you don’t have them):
ssh-keygen -t rsa -b 4096 -C "myemail@example.com"ssh-keygen: The utility to generate SSH key pairs.-t rsa: Specifies the encryption type (RSA is common and secure). You might also seeed25519for more modern, smaller, and faster keys.-b 4096: Specifies the key length in bits (4096 bits for RSA is highly recommended).-C "myemail@example.com": Adds a comment to the public key, useful for identification. You’ll be prompted for a passphrase. Always set a strong passphrase for your private key. This encrypts your private key on your local machine, adding an extra layer of security. Even if someone steals your private key, they can’t use it without the passphrase. The generated keys will typically be~/.ssh/id_rsa(private) and~/.ssh/id_rsa.pub(public).
-
Copy the Public Key to the Remote Server: This is the most critical step. I use
ssh-copy-idas it handles permissions correctly and is generally foolproof.ssh-copy-id username@vm-ipaddressThis command will prompt you for the user’s password on the remote server (the last time you’ll need it!) and then append your public key (
~/.ssh/id_rsa.pub) to the~/.ssh/authorized_keysfile on the remote server.If
ssh-copy-idisn’t available or you prefer to do it manually:cat ~/.ssh/id_rsa.pub | ssh username@vm-ipaddress "mkdir -p ~/.ssh && chmod 700 ~/.ssh && cat >> ~/.ssh/authorized_keys && chmod 600 ~/.ssh/authorized_keys"This command pipes your public key to the remote server, creates the
.sshdirectory if it doesn’t exist, sets secure permissions (700for.sshand600forauthorized_keys), and appends the key toauthorized_keys. Maintaining correct permissions on~/.sshand~/.ssh/authorized_keysis absolutely vital for SSH key authentication to work. If they’re too permissive, SSH will refuse to use the keys. -
Test the Key-Based Connection:
ssh username@vm-ipaddressIf successful, you’ll be prompted only for your private key passphrase (if you set one), not the remote user’s password. This is the moment I breathe a sigh of relief – successful key authentication!
My Key Management Philosophy:
- One Key Pair Per Machine: I typically use one primary key pair for my administrative workstation.
- Passphrase Protection: Always, always use a strong passphrase for my private key.
- SSH Agent: For convenience, I use
ssh-agent. This program holds my decrypted private keys in memory for a session, so I only have to enter my passphrase once when I first log in to my local machine or when I add the key to the agent.eval "$(ssh-agent -s)"ssh-add ~/.ssh/id_rsa(or the path to your private key)
- Disable Password Authentication on Servers: Once key-based authentication is working reliably, I strongly recommend disabling password authentication on your SSH servers. This is done by editing
/etc/ssh/sshd_configand settingPasswordAuthentication no, then restarting thesshdservice. This dramatically enhances security against brute-force attacks.
SSH for File Transfer and Port Forwarding
SSH isn’t just for shell access. It’s a versatile tool that underpins several other crucial remote operations.
Secure File Transfer: scp and sftp
I frequently need to transfer files to and from remote servers, and scp (Secure Copy Protocol) and sftp (SSH File Transfer Protocol) are my go-to commands.
-
scp(Secure Copy):scpis a command-line utility for copying files between hosts over an SSH connection. It’s akin to thecpcommand but works across networks.- Copying a local file to a remote server:
scp /path/to/local/file username@vm-ipaddress:/path/to/remote/directory/Example:
scp my_script.sh admin@192.168.1.100:/opt/scripts/ - Copying a remote file to your local machine:
scp username@vm-ipaddress:/path/to/remote/file /path/to/local/directory/Example:
scp admin@192.168.1.100:/var/log/nginx/access.log .(copy to current directory) - Copying directories recursively: Use the
-rflag.scp -r /path/to/local/dir username@vm-ipaddress:/path/to/remote/dir/
scpis excellent for quick, one-off file transfers from the command line. - Copying a local file to a remote server:
-
sftp(SSH File Transfer Protocol):sftpprovides an interactive file transfer program, similar to FTP but over a secure SSH connection. It’s useful when you need to browse remote directories, create folders, or perform multiple transfers.sftp username@vm-ipaddressOnce connected, you get an
sftp>prompt where you can use commands like:ls: List remote directory contents.lls: List local directory contents.cd /remote/path: Change remote directory.lcd /local/path: Change local directory.get remote_file: Download a file.put local_file: Upload a file.byeorexit: Exit sftp.
For more complex file management, especially when I need a graphical interface, I often use tools like FileZilla or WinSCP, which also leverage
sftpunder the hood.
SSH Tunneling and Port Forwarding
This is where SSH truly shines for more advanced use cases. SSH port forwarding creates secure tunnels that allow you to route network traffic securely between your local machine and a remote server, even for services that aren’t inherently secure or are on restricted networks.
-
Local Port Forwarding (
-L): This is the most common type. It allows you to access a service on a remote server from your local machine as if it were running locally.ssh -L 8080:remote-host:80 username@vm-ipaddressBreakdown:
-L: Specifies local port forwarding.8080: The local port on your machine.remote-host: The IP address or hostname of the target service from the perspective of the SSH server. This could belocalhostif the service is on the SSH server itself, or another server in the remote network.80: The port of the target service onremote-host.username@vm-ipaddress: Your standard SSH connection details to the tunnel endpoint.
My Use Case: I often use this to access a web application running on port 80 (or 443) on an internal server that isn’t directly exposed to the internet.
ssh -L 8080:localhost:80 webserver-prodNow, if I open my local browser and go to
http://localhost:8080, my traffic will be securely tunneled throughwebserver-prodto its own port 80. Incredibly powerful for development and testing. -
Remote Port Forwarding (
-R): Less common for typical client-server interaction, but useful when you need to make a local service accessible on a remote machine.ssh -R 8080:localhost:80 username@vm-ipaddressThis means traffic to port
8080on the remote server will be forwarded to port80on your local machine. Useful if you need to demonstrate a local development server to someone on the remote network. -
Dynamic Port Forwarding (
-D) / SOCKS Proxy: This transforms your SSH client into a SOCKS proxy, allowing you to tunnel all your network traffic (e.g., from a web browser) through the SSH server.ssh -D 8080 username@vm-ipaddressNow, configure your browser or application to use
localhost:8080as a SOCKS5 proxy. All your internet traffic from that application will pass through the SSH tunnel. This is invaluable for securely Browse from untrusted networks or accessing geographically restricted content through your server’s location.
Hardening Your SSH Server: Best Practices for sshd_config
While we’ve focused on the client side, a secure SSH connection also relies heavily on a properly configured SSH server. As a system administrator, securing the sshd_config file (/etc/ssh/sshd_config) is one of my top priorities. After making changes, always restart the SSH service (e.g., sudo systemctl restart sshd on systemd systems, or sudo service sshd restart on older init systems).
Here are key settings I always configure:
- Disable Password Authentication:
PasswordAuthentication noAfter setting up SSH key-based authentication, this is the first thing I change. It eliminates the risk of brute-force password attacks.
- Disable Root Login:
PermitRootLogin noLogging in directly as root is generally discouraged. Instead, log in as a regular user and then use
sudofor administrative tasks. This provides an audit trail and prevents direct attacks on the root account. - Change Default SSH Port:
Port 2222While not a security panacea (a port scanner can easily find open ports), changing the default port from 22 reduces the noise from automated bots constantly scanning for SSH on port 22. It makes your server less visible to casual scans. Remember to update your firewall rules to allow traffic on the new port!
- Allow Only Specific Users/Groups:
AllowUsers user1 user2
AllowGroups admin_group
This explicitly defines which users or groups are permitted to log in via SSH. It’s a strong whitelist approach that denies access to anyone not on the list.
- Disable X11 Forwarding (if not needed):
X11Forwarding noIf you don’t need to run graphical applications remotely, disable this to reduce the attack surface.
-
Use Strong Kex, Ciphers, and MACs (Advanced): The
sshd_configfile also allows you to specify which key exchange algorithms, ciphers, and Message Authentication Codes (MACs) SSH should use. I always aim for modern, strong algorithms. Tools likessh-auditcan help you assess your current configuration.Example (research current best practices for these):
KexAlgorithms curve25519-sha256@libssh.org,ecdh-sha2-nistp521,ecdh-sha2-nistp384,ecdh-sha2-nistp256,diffie-hellman-group-exchange-sha256
Ciphers chacha20-poly1305@openssh.com,aes256-gcm@openssh.com,aes128-gcm@openssh.com,aes256-ctr,aes192-ctr,aes128-ctr
MACs hmac-sha2-512-etm@openssh.com,hmac-sha2-256-etm@openssh.com,umac-128-etm@openssh.com
Always test your SSH connection after making changes to
sshd_config!
Keep an
old session openuntil you confirm you can log in with the new configuration.
Troubleshooting Common SSH Issues
Even with all the knowledge, I still occasionally run into SSH connection issues. Here are some common problems and my troubleshooting steps:
- “Connection refused”:
- Is the SSH server running (
sshd) on the remote machine? (sudo systemctl status sshd) - Is the firewall blocking port 22 (or your custom port)? (
sudo ufw statusorsudo firewall-cmd --list-all) - Is the remote IP address correct? Can you
pingit?
- Is the SSH server running (
- “Permission denied (publickey, password)”:
- Password authentication: Is the username correct? Is the password correct? Is
PasswordAuthenticationdisabled on the server? - Key authentication:
- Are the permissions on
~/.ssh(700) and~/.ssh/authorized_keys(600) correct on the remote server? - Is your private key added to
ssh-agent? (ssh-add -l) - Is your public key actually in the
authorized_keysfile on the remote server? - Is the
IdentityFilespecified correctly in your~/.ssh/config? - Check
PermitRootLoginif you’re trying to log in as root.
- Are the permissions on
- Password authentication: Is the username correct? Is the password correct? Is
- “Host key verification failed”:
- This happens if the remote server’s host key has changed. This could indicate a MitM attack or a legitimate server reinstallation/IP change.
- Remove the old host key from your
~/.ssh/known_hostsfile (the error message usually tells you which line to remove). - Verify the new fingerprint out-of-band before connecting.
- Verbose Output for Debugging:
The
-v(verbose) flag is your best friend when troubleshooting SSH.ssh -v username@vm-ipaddressFor even more verbosity, use
-vvor-vvv. This will show you the entire negotiation process, which key it’s trying, authentication methods, and where the connection might be failing.
Mastering SSH isn’t just about memorizing commands; it’s about understanding the underlying principles of secure communication and applying best practices to safeguard your systems. By embracing key-based authentication, hardening your sshd_config, and leveraging the power of ~/.ssh/config, you’ll not only streamline your workflow but also build a fortress of security around your Linux infrastructure. It’s a skill that pays dividends every single day, allowing me to manage my digital domain with confidence and control.